Acp Observatory Control Software Cracks
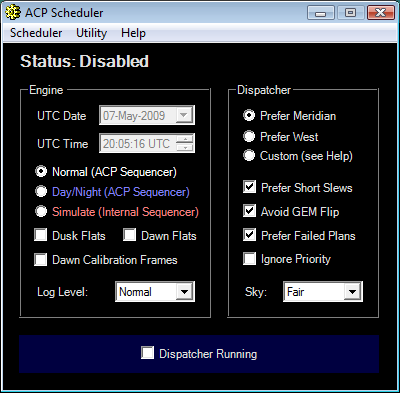
Free Download and information on ACP Scheduler - This is the web site for ACP Scheduler, a companion program to ACP Observatory Control Software (ACP). Scheduler is a 'just in time' scheduler, able to cope with varying observing conditions. This is the web site for ACP Scheduler, a companion program to ACP Observatory Control Software (ACP). Together, the two programs make up ACP Expert. Scheduler is a 'just in time' scheduler, able to cope with varying observing conditions and requests added during a run.
Jump to:, This page is to document our upgrade to a new observatory computer with Windows 7. The original machine used to control the telescope (from commissioning in 2009 through summer of 2012) ran Windows XP. So there may be some issues encountered in the upgrade. Thorough documentation here should (hopefully) help with next time we need to upgrade hardware or software. Initial testing was done with the same computer, but with a fresh Windows 7 install on a separate disk; so not everything in the first section may be completely the same with the new computer. (Eric Jensen, July ) Software installation (New notes with new computer, August 16- 2012.) To determine best plan for software installation, I contacted Bob Denny at DC3-Dreams (publisher of ACP) for advice on order of installation. He said 'Install the ASCOM Platform 6 first.
Then install the TheSky Controlled Telescope driver. Then the TCC Software. Check TheSky out with your scope. Then check it via the ASCOM driver using the POTH tool that comes with the ASCOM Platform. Then MaxIm as ACP will be looking for it during installation.
Then ACP and Hot Fix 4. Make sure at the end of the Hot Fix to use the 'Register TCC for ASCOM' option, their software fails to do this and is no longer maintained by them. Next install the Digital Domeworks ASCOM Driver (DDWCP is not needed though can be useful for troubleshooting).' • Installed RealVNC free version • Installed Norton Ghost and backed up the computer in initial state. • Installed ASCOM platform 6 SP1 from. • Installed TheSky Controlled Telescope Driver version 5.2.10 from.
During installation, chose the option to also have it install the source files. • Installed RCOS TCC: • Get files from the. • The last full installer there is 1.5.17, so download and install that first. 
• Then download and copy over just the 1.5.26 RCOS-ae.exe file into the Program Files -> RCOS TCC folder. • These programs run into problems with Windows User Account Control, so either need to turn that off completely, or do the workaround below: • Make shortcuts for both RCOS TCC and RCOS-ae on the desktop. • Right-click and then choose 'Properties', and in that dialog, select 'Run as administrator.' • Before the TCC starts up, you will then always be asked if it's OK to run a program from an unknown publisher - just click 'Yes'. • In order for the TCC to run under Windows 7, the executable RCOS-ae has to be run first (just once per reboot).
When you run this, nothing appears to happen, but if you don't the TCC won't work - you'll just get 'unable to connect to RCOS COM object' or something like that. To make this simple: • Move the shortcut for RCOS-ae (created in the step above) into the 'Startup' folder in the Start menu (under the 'All Programs' listing). • RCOS-ae will then run at startup without any user intervention, and so starting the TCC is just as simple as before under Win XP - just double-click the file.
• Finally, to get the presets from the old install, copy over the file RCOS.dat from the Program Files -> RCOS TCC folder. This has those values saved. • TheSky 6: • Use the DVD we have to install TheSky 6. (This installs 6.0.0.32; need to enter serial number from packaging.) • Apply the updater to update to 6.0.0.65 (downloaded from.) • Apply a 'daily build' update; download from, then replace only the executable file 'TheSky6'. This updates to 6.0.0.68. • To copy over previous settings: • Copy old Normal.sky file to new installation; it lives in Documents/Software Bisque/TheSky6/Documents. It should contain the Tpoint model as well.
• Also copy over the folder 'Field of View Indicators' in Documents/Software Bisque/TheSky6/. • After telling it that the telescope is a Paramount ME, then also had to configure the server that lets it talk to ASCOM, via the 'TheSky-controlled-telescope' plugin. To do this, go to Telescope -> Server Settings and check all the boxes there, as described in more detail. • To test the ASCOM connection to the telescope, I used the POTH tool that came with the ASCOM distribution. 
I found that I could not connect to the telescope unless I disabled Windows 7's UAC, so I did that (which makes some other things simpler, anyway). • I also had to choose Telescope -> Options -> PEC -> Enable to get it to apply the periodic error correction (stored in the telescope's flash memory); it wasn't enabled by default. • Note added after an evening test: All seemed to go pretty smoothly, with only the following small glitch: • When I first pointed the telescope, the pointing seemed to be off - I couldn't match the starfield I was seeing with what I expected. I wondered about the pointing model, so I double-clicked on the Tpoint model window in TheSky, and at first it said that it couldn't connect to the object. I tested to make sure I could (separately) start Tpoint, then I quit Tpoint and tried again to open the Tpoint model from within TheSky. This time it opened up fine, and showed me the data for the latest pointing model.